Group vs Attach

There are similarities but also some important differences between the grouping and attaching feature in CoSpaces. So how to know what to choose? But before I’ll explain, here again how to do it in the first place.

To create a group select the objects and click the group option or press the g key.

To attach one object to another, select the attach feature, choose a slot on the other object and adjust as needed.

So what is the difference?


Orientation

When grouping two objects, an enclosing group object will be created. All objects are child elements of this object.

group2

Now imagine that we want to move this group forward using Blockly. But what is forward if, for example, we set the man to look in one direction and the dog looks in the other direction? We don’t really know until we try it out, and sometimes the group’s “forward” doesn’t make much sense.

On the other hand, when we attach one object to another we are going to create a parent-child relationship between them.

attach2

The dog is now a child element of the man and when the man is moving forward the dog will follow along, no matter what direction the dog is looking at.


Rotation

Have a look at this group hirarchy and Blockly code.

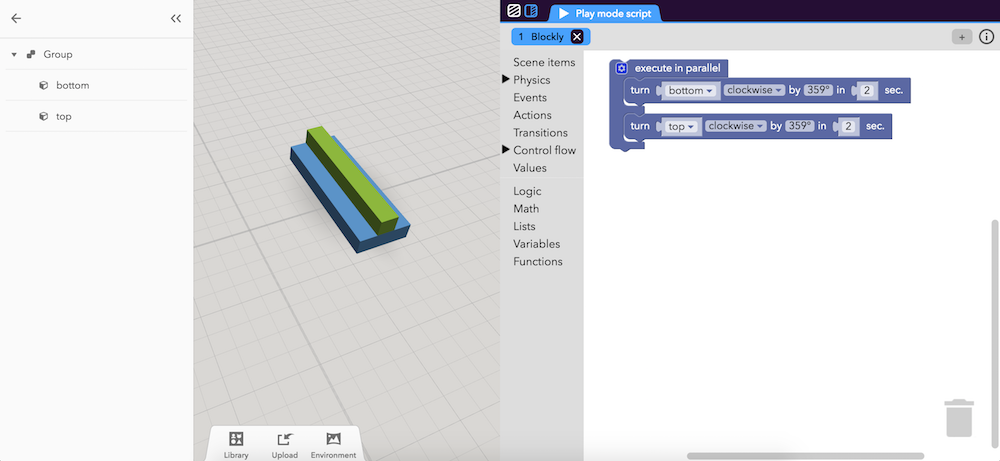
Now we run the script.

The blue bottom block and the green top block are both child elements of the group object and they’re rotating independently (in this case they’re both rotating 360° clockwise).

What would happen if we attach the green block to the blue one instead?

Now because the green block is a child element of the blue one, it will take its rotation into account. The rotation is additive.


Animation

Animated objects are a big reason to use the attach feature. The slots which objects are attached to take the animations of the parent object into account. Have a look.

This can’t be done (or would be quite complicated) when these objects are in a group instead.


Conclusion

So what you should use? It depends on what you want to achieve. There is no better or worse method, but this small tutorial should help you to have a better understanding of the differences.

7 Likes

Is it possible to put an individual object into more than one group? So the effect of actions on group 1 and group 2 would change it equally but in separate ways?

No, each object has only one parent.
Which behaviour do you want to implement using this feature?

I am trying to figure out how to build and code a VR Rubix Cube. It is hurting my brain at the moment as I try to figure out how to best make it work.

1 Like

Cool idea! I guess you want to add interactivity using Blockly only, should be already possible in JavaScript though.

The interactivity issue is that I need to turn a set of 9 blocks together when one is clicked. I tried using the block with the origin but it doesn’t seem to spin around the center block.
I am not sure how to create this in JavaScript, I have only really used it for basic commands.

Hello btcostello05,

the example below shows how you can use attaching to implement Rubic’s Cube. The idea is to keep relations between outline blocks and center block only during rotation. Outline blocks become children of center block by invoking method parentcube.add(childcube). After rotation is finished they are removed from their parent by inkoving method removeFromParent().

All cubes which changed their places by rotation are swapped with cubes on their original positions to get a right place in three-dimensional source array.

var scale = 1.75;

var cubes = [];
for (var i = 0; i < 3; i++) {
    cubes[i] = [];
    for (var j = 0; j < 3; j++) {
      cubes[i][j] = [];
        for (var k = 0; k < 3; k++) {
            cubes[i][j][k] = Scene.createItem("Cube", i - 1, j - 1, k);
            cubes[i][j][k].setScale(scale);
        }
    }
}

var rotateAround112 = function () {
    var center = cubes[1][1][2];
    for (var i = 0; i < 3; i++) {
        for (var j = 0; j < 3; j++) {
            center.add(cubes[i][j][2]);
        }
    }
    center.rotateLocal(0, 0, 1, Math.PI * 0.5, 3, function () {
        var temp = cubes[0][0][2];
        cubes[0][0][2] = cubes[2][0][2];
        cubes[2][0][2] = cubes[2][2][2];
        cubes[2][2][2] = cubes[0][2][2];
        cubes[0][2][2] = temp;

        temp = cubes[0][1][2];
        cubes[0][1][2] = cubes[1][0][2];
        cubes[1][0][2] = cubes[2][1][2];
        cubes[2][1][2] = cubes[1][2][2];
        cubes[1][2][2] = temp;

        for (var i = 0; i < 3; i++) {
            for (var j = 0; j < 3; j++) {
                cubes[i][j][2].removeFromParent();
            }
        }

        rotateAround211();
    });
};

var rotateAround211 = function () {
    var center = cubes[2][1][1];
    for (var i = 0; i < 3; i++) {
        for (var j = 0; j < 3; j++) {
            center.add(cubes[2][i][j]);
        }
    }
    center.rotateLocal(0, 0, 0.25 * scale, 1, 0, 0, Math.PI * 0.5, 3, function () {

        var temp = cubes[2][0][0];
        cubes[2][0][0] = cubes[2][2][0];
        cubes[2][2][0] = cubes[2][2][2];
        cubes[2][2][2] = cubes[2][0][2];
        cubes[2][0][2] = temp;

        temp = cubes[2][0][1];
        cubes[2][0][1] = cubes[2][1][0];
        cubes[2][1][0] = cubes[2][2][1];
        cubes[2][2][1] = cubes[2][1][2];
        cubes[2][1][2] = temp;

        for (var i = 0; i < 3; i++) {
            for (var j = 0; j < 3; j++) {
                cubes[2][i][j].removeFromParent();
            }
        }

        rotateAround112();
    });
};

rotateAround112();
2 Likes

We’re also going to have a look at what is needed (e.g. additional blocks) to implement it in Blockly.

3 Likes

This is awesome, but I need to learn a lot more about javascript to write that. I will see if I can get this to apply to the rest of the cubes and color code them.